![]()
![]()
Note that in order to proceed with this cookbook, you need to have at least a rudimentary knowledge of UNIX commands (e.g. cp, rcp, cd, mkdir, rlogin...) and text-editing (using e.g. vi or textedit). There is a manpage viewer which you can use to determine the correct usage of commands (e.g. test the ones listed in the previous sentence); to utilise it, click here and enter the command name in the Topic field.
 (Thanks to Beware of Cat! for the animated cat image.)
 Important: Create a working directory named orbit_frame, for example 24707_2925, for each image.
There are two methods for pre-processing the data. In the first method (steps 1a), the required files (.ldr, .vdf and .raw) are copied from the archive if they are already stored there. If the files are not stored on the archive, you must retrieve them from tape (steps 1b) or cd. 1. Data pre-processing
The .SLC file may be viewed using either ER Mapper (steps 3a) or xgips (steps 3b).
When determining the offset, you first want to determine a rough offset, and then calculate the precise offset (and stretch parameters). The accuracy required for the rough offset is less than 20 pixels.
To determine the rough offset you can either use graphical methods (steps 4.a.1 and 4.a.2) or ers_baseline (step 4.a.3). offset = repeat coordinates - reference coordinates
4.a.1 Follow steps 3a and Appendix B, part 4 (ER Mapper) or 3b (xgips) for viewing the pair of reference and repeat .SLC images (converted to amplitude). 4.a.2 Determine coordinates for a feature identifiable in both images. Notes: (1) if you will be determining the offset using amplitude images in ER Mapper, you will need to multiply the observed y-coordinates by 4 due to the downsampling in Appendix A, part 1; (2) if you will be determining the offset using xgips, alternately move the mouse and hit the central mousekey to zoom (Figure 4.1) and determine the coordinates of the chosen point (Figure 4.2). Commands to move the screen view etc can be determined by pressing the righthand mousekey and while keeping it depressed, moving downward to highlight Move, and then moving right. Release the mousekey to activate the move.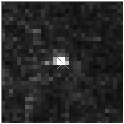 Figure 4.1: Example zoom window view. Note small cross-hair in the centre.
 Figure 4.2: Example pixel coordinates. Note that the relevant coordinates (i.e. those still in the radar frame of reference, and not downsampled) are bracketed: x=673.5, y=838.
 Figure 4.3: Section of an interferogram.
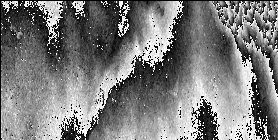 Figure 4.4: Section of an interferogram. Relatively poor correlation caused by offset difference of 0.52 (2 d.p.) pixels in x and 0.63 (2 d.p.) pixels in y (also slight change in stretch).
![]()
![]()
![]()
Click here to view the flowchart of processing steps.
![]()
Click here to view the flowchart of processing scripts.
![]()
Note: refer to the GIPS manual or webpages for more detailed instructions and/or utilise man2html to view manpages. The following are some of the GIPS commands which you are likely to use most frequently: git - list image/head values iha - image arithmetic ihm - merge/resample images ihrot - image rotation/reversal/inversion ihs - strip image header GIPS commands are successively performed on images using pipes. That is, the results of one GIPS command are piped to the next command, and so forth. Here are some examples:
1 Create an amplitude image from an I2 format .SLC file for viewing in ER Mapper Files created using the default I2 format cannot be viewed directly using ER Mapper. In order to create an amplitude image which can be viewed in ER Mapper, first create a GIPS header file for the SLC file (using prm2gips on the .PRM file). You must then concatenate (cat) that header to the .SLC file, filter the resultant image (using ihconv), resample it (using ihm), invert it E-W (using ihrot, since otherwise you will be viewing the image in the radar frame of reference) and then strip off its GIPS header (using ihs). The complete command string to use is: prm2gips file.PRM file.head cat file.head file.SLC | ihconv 4 1 /opt/siosar/filters/gauss5x3 | ihm -m "dmin=-1.e-8 dmax=4.e-7 dnull=1.e-5" | ihrot -n -r | ihs -s > file E.g. to create a viewable amplitude image for 24707_2925.SLC, type: prm2gips 24707_2925.PRM 24707_2925.head cat 24707_2925.head 24707_2925.SLC | ihconv 4 1 /opt/siosar/filters/gauss5x3 | ihm -m "dmin=-1.e-8 dmax=4.e-7 dnull=1.e-5" | ihrot -n -r | ihs -s > 24707_2925_amp N.b. The ihconv arguments used above (4 and 1) force downsampling of the resultant image (by 4 in the y-direction and 1 in the x-direction, respectively). If you wish to use a different sampling rate, adjust the arguments to suit (for another example of downsampling, see Appendix A part 6).
2 Create an amplitude image from an R4 (non-I2) .SLC file for viewing using xgips To create an amplitude file from an R4 (non-I2) .SLC file, you must create a GIPS header (using prm2gips on the .PRM file), concatenate (cat) that header to the .SLC file, perform arithmetic (using iha) on the resultant complex image file in order to produce an amplitude image, and then invert that image East-West (using ihrot, since otherwise you will be viewing the image in the radar frame of reference). The complete command string to use is: prm2gips file.PRM file.head R4 cat file.head file.SLC | iha -m "dtype=f" "p=sqrt(r1*r1+i1*i1)" | ihrot -n -r > file.gips E.g. to create a viewable amplitude image for 24707_2925.SLC, type: prm2gips 24707_2925.PRM 24707_2925.head R4 cat 24707_2925.head 24707_2925.SLC | iha -m "dtype=f" "p=sqrt(r1*r1+i1*i1)" | ihrot -n -r > 24707_2925_amp.gips
3 Create an amplitude image from an I2 format .SLC file for viewing with xgips As for Appendix A part 1, but without stripping the GIPS header. The complete command string to use is: prm2gips file.PRM file.head cat file.head file.SLC | ihconv 4 1 /opt/siosar/filters/gauss5x3 | ihm -m "dmin=-1.e-8 dmax=4.e-7 dnull=1.e-5" | ihrot -n -r > file.gips E.g. to create a viewable amplitude image for 24707_2925.SLC, type: prm2gips 24707_2925.PRM 24707_2925.head cat 24707_2925.head 24707_2925.SLC | ihconv 4 1 /opt/siosar/filters/gauss5x3 | ihm -m "dmin=-1.e-8 dmax=4.e-7 dnull=1.e-5" | ihrot -n -r > 24707_2925_amp.gips
4 Create an amplitude image from an R4 (non-I2) .SLC file for viewing in ER Mapper As for Appendix A part 2, but you must also strip the GIPS header. The complete command string to use is: prm2gips file.PRM file.head R4 cat file.head file.SLC | iha -m "dtype=f" "p=sqrt(r1*r1+i1*i1)" | ihrot -n -r | ihs -s > file E.g. to create a viewable amplitude image for 24707_2925.SLC, type: prm2gips 24707_2925.PRM 24707_2925.head R4 cat 24707_2925.head 24707_2925.SLC | iha -m "dtype=f" "p=sqrt(r1*r1+i1*i1)" | ihrot -n -r | ihs -s > 24707_2925_amp
5 Create a phase image from an R4 (non-I2) .SLC file As for the above example, but you must substitute the phase expression for the amplitude expression. The complete command string to use is: prm2gips file.PRM file.head R4 cat file.head file.SLC | iha -m "dtype=f" "p=atan2(i1/r1)" | ihrot -n -r | ihs -s > file E.g. to create a viewable phase image for 24707_2925.SLC, type: prm2gips 24707_2925.PRM 24707_2925.head R4 cat 24707_2925.head 24707_2925.SLC | iha -m "dtype=f" "p=atan2(i1/r1)" | ihrot -n -r | ihs -s > 24707_2925_phase Of course, if you wanted a GIPS phase file, you would not strip the header.
6 Downsample a GIPS file To downsample a GIPS file (i.e. a file which has an incorporated GIPS header file), you must use the ihm command. So, to downsample a GIPS file originally of size 6144 columns x 28000 rows by a factor of 2 in range and 4 in azimuth, you must type: ihm -m "xmin=0 xmax=6144 xnum=3072 ymin=0 ymax=28000 ynum=7000" file.gips > out.gips E.g. to downsample the amplitude GIPS file above, type: ihm -m "xmin=0 xmax=6144 xnum=3072 ymin=0 ymax=28000 ynum=7000" 24707_2925.gips > 24707_2925_downsamp.gips If instead of a GIPS file you were using a stripped file, you would first need to concatenate (cat) the GIPS header. The complete command string to use is: cat file.head file | ihm -m "xmin=0 xmax=6144 xnum=3072 ymin=0 ymax=28000 ynum=7000" > out.gips E.g. to downsample the amplitude stripped file above, type: cat 24707_2925.head 24707_2925_amp | ihm -m "xmin=0 xmax=6144 xnum=3072 ymin=0 ymax=28000 ynum=7000" > 24707_2925_downsamp.gips
7 Subdivide a GIPS file If instead of downsampling, you wanted to subdivide a GIPS file - say cut out the upper lefthand section - you would use the following command (assuming a file the same size as above, i.e. 6144x28000): ihm -m "xmin=0 xmax=3072 xnum=3072 ymin=0 ymax=7000 ynum=7000" file.gips > out.gips E.g. to downsample the amplitude GIPS file for 24707_2925.SLC, type: ihm -m "xmin=0 xmax=3072 xnum=3072 ymin=0 ymax=7000 ynum=7000" 24707_2925_amp.gips > 24707_2925_downsamp.gips
8 Create a GIPS header by stripping it from a GIPS file To create a GIPS header by stripping it from a GIPS file, you must use the git command. The command string to use is: git -n file.gips > file.head E.g. to create a header for 24707_2925_amp.gips, type: git -n 24707_2925_amp.gips > 24707_2925_amp.head
![]()
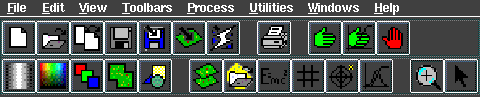 ER Mapper main menu (standard and common functions). Selected icons, clockwise from top left: 2 Open Algorithm, 3 Copy Window and Algorithm, 9 Go, 11 Stop, 12 Position, 13 zoom, 14 Histogram, 16 Filtering, 17 Equation.
Note: to stop a process at any time, click on the Stop icon 1 Opening an image
1.1 Click on the Open Algorithm icon 2 Viewing a non-I2 (R4) amplitude or phase image
2.1 Load the .SLC file as instructed above.
2.2 Click on the Equation icon 3 Filtering the image
3.1 Click on the Filtering icon 4 Zooming and determining image offsets
4.1 Enter zoom mode by clicking on the Zoom icon ![]() of the main menu bar; to start a process, click on the Go icon
of the main menu bar; to start a process, click on the Go icon ![]() .
.
![]() of the main menu bar - a blank window will appear.
1.2 A selection window will also appear. About three-quarters of the way down the page, under "Files of Type:", the default file type will be listed as Algorithm Data View (.alg). Press the down-arrow to the right and select Raster Image (.ers). Now select your data directory by pressing the topmost down-arrow and working through the directory tree (double-clicking your chosen directories).
1.3 When you have selected your image file, press OK. The image will appear in the window (after a possible delay). Resize the window in the same manner as you would a terminal window (if desired).
Note: To open another window, click on the Copy Window and Algorithm icon
of the main menu bar - a blank window will appear.
1.2 A selection window will also appear. About three-quarters of the way down the page, under "Files of Type:", the default file type will be listed as Algorithm Data View (.alg). Press the down-arrow to the right and select Raster Image (.ers). Now select your data directory by pressing the topmost down-arrow and working through the directory tree (double-clicking your chosen directories).
1.3 When you have selected your image file, press OK. The image will appear in the window (after a possible delay). Resize the window in the same manner as you would a terminal window (if desired).
Note: To open another window, click on the Copy Window and Algorithm icon ![]() . The new window will now become current (designated by asterisks at the top of the window frame). In order to make another window current, move the cursor into the desired window and click the right-hand mousekey.
. The new window will now become current (designated by asterisks at the top of the window frame). In order to make another window current, move the cursor into the desired window and click the right-hand mousekey.![]() of the main menu bar.
2.3 The top box (just below the Apply changes button) should read "INPUT1". Edit this to:
sqrt(input1*input1+input2*input2)
or
atan(input2/input1)
for the amplitude or phase image, respectively.
2.4 Click on the Apply changes button, then the Close button, and finally on the Go icon
of the main menu bar.
2.3 The top box (just below the Apply changes button) should read "INPUT1". Edit this to:
sqrt(input1*input1+input2*input2)
or
atan(input2/input1)
for the amplitude or phase image, respectively.
2.4 Click on the Apply changes button, then the Close button, and finally on the Go icon ![]() of the main menu bar.
of the main menu bar. ![]() of the main menu bar.
3.2 Click on the File button and choose Load.
3.3 Select the desired filter (e.g. median 5x5 kernel) and press OK.
3.4 Click on the Close button and then on the Go icon
of the main menu bar.
3.2 Click on the File button and choose Load.
3.3 Select the desired filter (e.g. median 5x5 kernel) and press OK.
3.4 Click on the Close button and then on the Go icon ![]() .
Note: In order to remove a filter, click on the Filtering icon, then on the Edit button, choose Delete this filter, then click on the Close button and the Go icon.
.
Note: In order to remove a filter, click on the Filtering icon, then on the Edit button, choose Delete this filter, then click on the Close button and the Go icon. ![]() .
4.2 Move the cursor to the desired image area and then click the left-hand mousekey and drag the zoom box to cover the desired area. Release the mousekey.
Note: To mooz back to the full image, click the right-hand mousekey, move the cursor down to Quick Zoom then to the right and then down to Zoom to Current Dataset.
4.3 Turn of the smoothing (if any) by clicking on the Position icon
.
4.2 Move the cursor to the desired image area and then click the left-hand mousekey and drag the zoom box to cover the desired area. Release the mousekey.
Note: To mooz back to the full image, click the right-hand mousekey, move the cursor down to Quick Zoom then to the right and then down to Zoom to Current Dataset.
4.3 Turn of the smoothing (if any) by clicking on the Position icon ![]() , clicking on View and selecting Cell Coordinate, then moving the cursor to your selected area and pressing the left-hand mousekey.
, clicking on View and selecting Cell Coordinate, then moving the cursor to your selected area and pressing the left-hand mousekey. ![]()
![]() Back to: InSAR class homepage
Back to: InSAR class homepage ![]()
Last modified: 18 October 2000