This question was more challenging than Question 1, but most people did well. Cool.
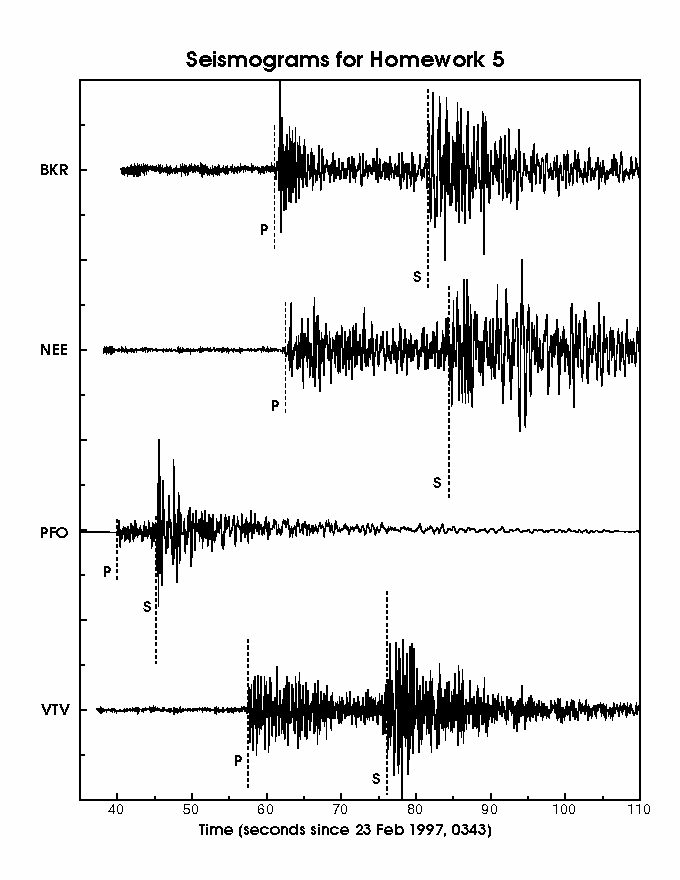
The first step for locating the earthquake is to pick the arrivals for the P and S waves and indicate them with arrows or lines so that I could find your picks easily. Figure 2 shows the traces with my picks marked by dashed lines (with ``P'' and ``S'' as appropriate).
Picking the P and S arrivals correctly is the hardest part of this problem. The right way to pick P arrivals is to look at the seismogram before the earthquake and see what it looks like, and then to pick the very first instant the record looks significantly different from before the earthquake. This does not mean that you pick the first large part of the P wave -- you should pick the very first part of the P wave, which may be much smaller than the big swings a second or so later. For the S wave, you have a bit tougher of a time, but basically you have to look at again the first instant that the waves look different after the P wave.
All I can say is that it's tough the first few times you pick the arrivals, but after a while, picking gets easier. I certainly don't expect you to get it perfectly right, and besides, my picks aren't necessarily ``perfect'', either. The fact is that, even when the picking is done by experienced people, using digital recording (rather than paper, like I gave you), the picks made by two people are usually different by as much as a couple tenths of a second for very sharp arrivals, and perhaps by as much as 0.5-1 second for less clear arrivals. So in this case, ``close'' is OK.
Once you have the P and S arrivals located, you need to figure out the times at which these waves were first recorded at the various stations. To do that, you need to use the time scale on the bottom of the figure. As an example, let's use the PFO record. The time scale is such that 1.1 centimeters is the same as 5 seconds. The earliest time mark (on the left edge of the figure, but it's unlabeled) is 35 seconds after 03:43. So I measure from the left side of the figure to my dashed line; that distance is roughly 1.1 centimeters. I can use the following equation to work out the time in seconds:

So the arrival time at PFO is 5.0 seconds after 03:43:35, which makes the PFO P arrival time 03:43:40.0. I can repeat the measurements (distance is about 2.24 cm) and calculations for the PFO S arrival and I get
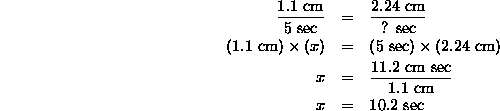
So the arrival time at PFO is 10.2 seconds after 03:43:35, which makes the PFO S arrival time 03:43:45.2.
Now that I have the PFO P and S arrival times, I can compute the PFO S-P time simply by subtracting the PFO P time from the PFO S time. In this case, the answer is 5.2 seconds.
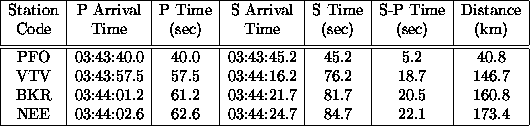
After I have the S-P time, I can go to the table I gave you of distance from S-P time, and find the distance from PFO to the earthquake. In this case, there is no listing in the table for 5.2 seconds, but there are listings for 5.0 and 6.0 seconds (39.2 and 47.1 km, respectively). I can use these distances and times, and my measured time, to get a good estimate for the distance from PFO to the earthquake.
To do so, I first figure out how much the difference in distance is from the smaller time to the larger time (5 seconds to 6 seconds); in this case, it is 47.1-39.2 = 7.9 km. Next, I need to figure out what fraction of a second I am above 5 seconds; in this case, the difference is 0.2 seconds. Finally, I multiply 0.2 by 7.9 and get 1.6 km. I need to add 1.6 km to 39.2 km to get the correct distance; in this case, 40.8 km is the distance from PFO to the earthquake.
Repeating the measurements and calculations for all four stations (both P and S arrivals), I can fill up Table 1. In Table 1, the stations are listed in order of increasing distance from the station to the earthquake. I've listed the arrival times both in the form that I'm used to seeing (like 03:44:01.2) and in the form that most people wrote their times in (like 61.2 seconds).
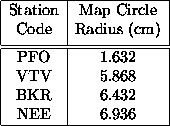
Once you have filled up your equivalent of Table 1, you need to convert your distances to the radii of the circles you need to draw on your map. To do this, you need to know the scale for your map. For those who got the homework handout in class, the scale was such that 1 centimeter on the map was equal to 25 kilometers in the real world. For those who downloaded the homework from the web page, I couldn't be sure the scale would stay the same, so I made a scale bar; you needed to measure the scale bar to work out your scale (it's different depending on your printer!).
Armed with the map scale, all you have to do is divide the distance in km by the map scale to convert to centimeters on your map. In the case of the handout in class, this means you divide by 25. If you do this for all the stations, you get Table 2.
The final step is to dig out your drawing compass and the map I gave you, and draw circles with the radii in Table 2. If you don't have a compass, you can fake it pretty well using a ruler; draw four or five points at the right radii and connect the dots as smoothly as you can. When you are finished, you should have a map which looks something like Figure 3.
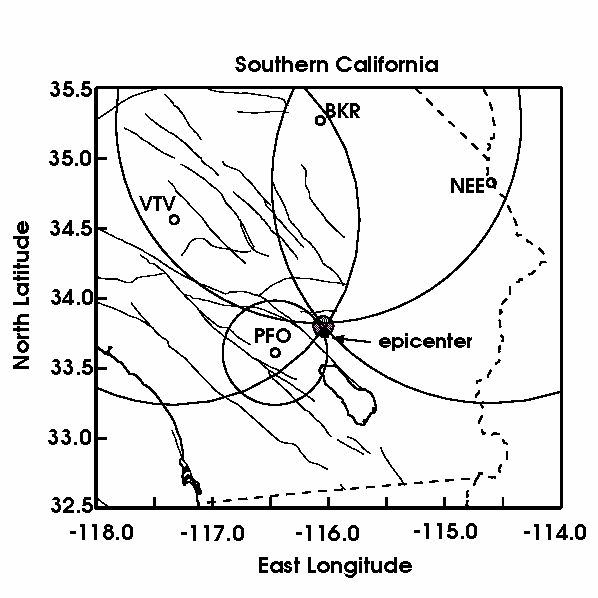
Figure 3. Map showing circles at correct radii from stations BRK, NEE, PFO, and VTV. Asterisk marked "epicenter" is the epicenter calculated by Caltech. Shaded circle is the area in which my estimate of the epicenter lies, counting uncertainties.
If you gave me a table like Table 1, a figure like Figure 2, a map like Figure 3, and your measured P and S arrival times are within a one second of mine, you got full credit. Each arrival time which was off by more than one second dropped one point. If your S-P times didn't match your arrival times, each one like that cost another point. If the distances you listed did not match your S-P times, each discrepancy was another point, and if your circles were the wrong size given your distances, each wrongly-sized circle was another point off. No table cost you five, and no labels for P and S on Figure 2 cost you five. This might seem anal, but it was designed this way so that people wouldn't lose too many points just by having troubles picking the P and S arrivals.
Somebody asked about this in lecture, so I thought I would tell you what the three-letter codes mean. Seismologists use three- and four-character station codes to keep the thousands of seismometers straight around the world. There is actually a committee to make sure that no two seismometers get the same name. Most of the time, the names are chosen to be something meaningful geographically (like PAS, which is in Pasadena). But even so, with three- character names, you can have almost 46700 stations before you run out of names. With four-character names, you can have 1,680,000 stations. Needless to say, we won't run out anytime soon, even though there are literally hundreds of seismometers in southern California alone.
In our case, BKR is Baker, NEE is Needles, PFO is the Piñon Flat Geophysical Observatory (I do some research there) between Anza and Palm Desert, and VTV is Victorville. You can find out more details on the Southern California Earthquake Center (SCEC) Southern California Seismographic Network (SCSN) Digital Broadband Stations page at http://www.scecdc.scec.org/terra.html.
I realize this problem was challenging, but I hope you found it at least somewhat interesting. As I said, nobody really locates earthquakes this way these days, but this is how it used to be done.
Greg Anderson